First page . . . Back to page 3 . . . Forward to page 5 . . . Last page (page 7)
Attaching a Planet and Moons to the Differential
20071226
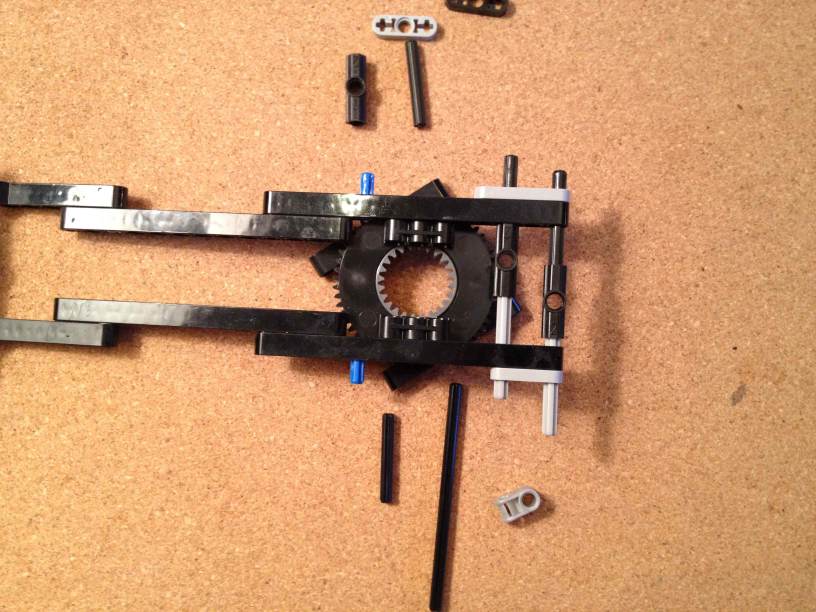
With the switch to set 8273 it was necessary to find a new, secure way to attach an arm to the differential because part part 3709b is not in that set. While I was doing this, I decided to also accomplish the secondary goal of being able to give this planet (the 4th planet, in versions F and G) one or more moons. Quite a bit of time was spent exploring options. Here are 5 of them:

side view

top view

side angle
The first one (upper-left) is used in all the Ayres/Koch designs, and my versions C, D and E. It is quite secure but relies on part 3709 and does not allow the relative motion of the central shaft to be extracted for driving moons.
The other two on the top row are similar to the one actually used in F and G. They allow the central shaft motion to be extracted, but only in a rudimentary way. There is no provision for counterbalancing, and extending the arm and its gears would be difficult.
The design on the bottom-left can be made entirely from the parts in sets 8273 and 8287 that remain after model G has been built. It sends the motion via a radial shaft with bevel and crown gears, has easy attachment points for counterweights, and leaves enough clearance for both of the gears on the differential housing to mesh with the planet arms above and below.
{The 5th design, shown on the bottom-right, is an alternative I found in 2012.}
H: Finishing the Inner Planets
20080101
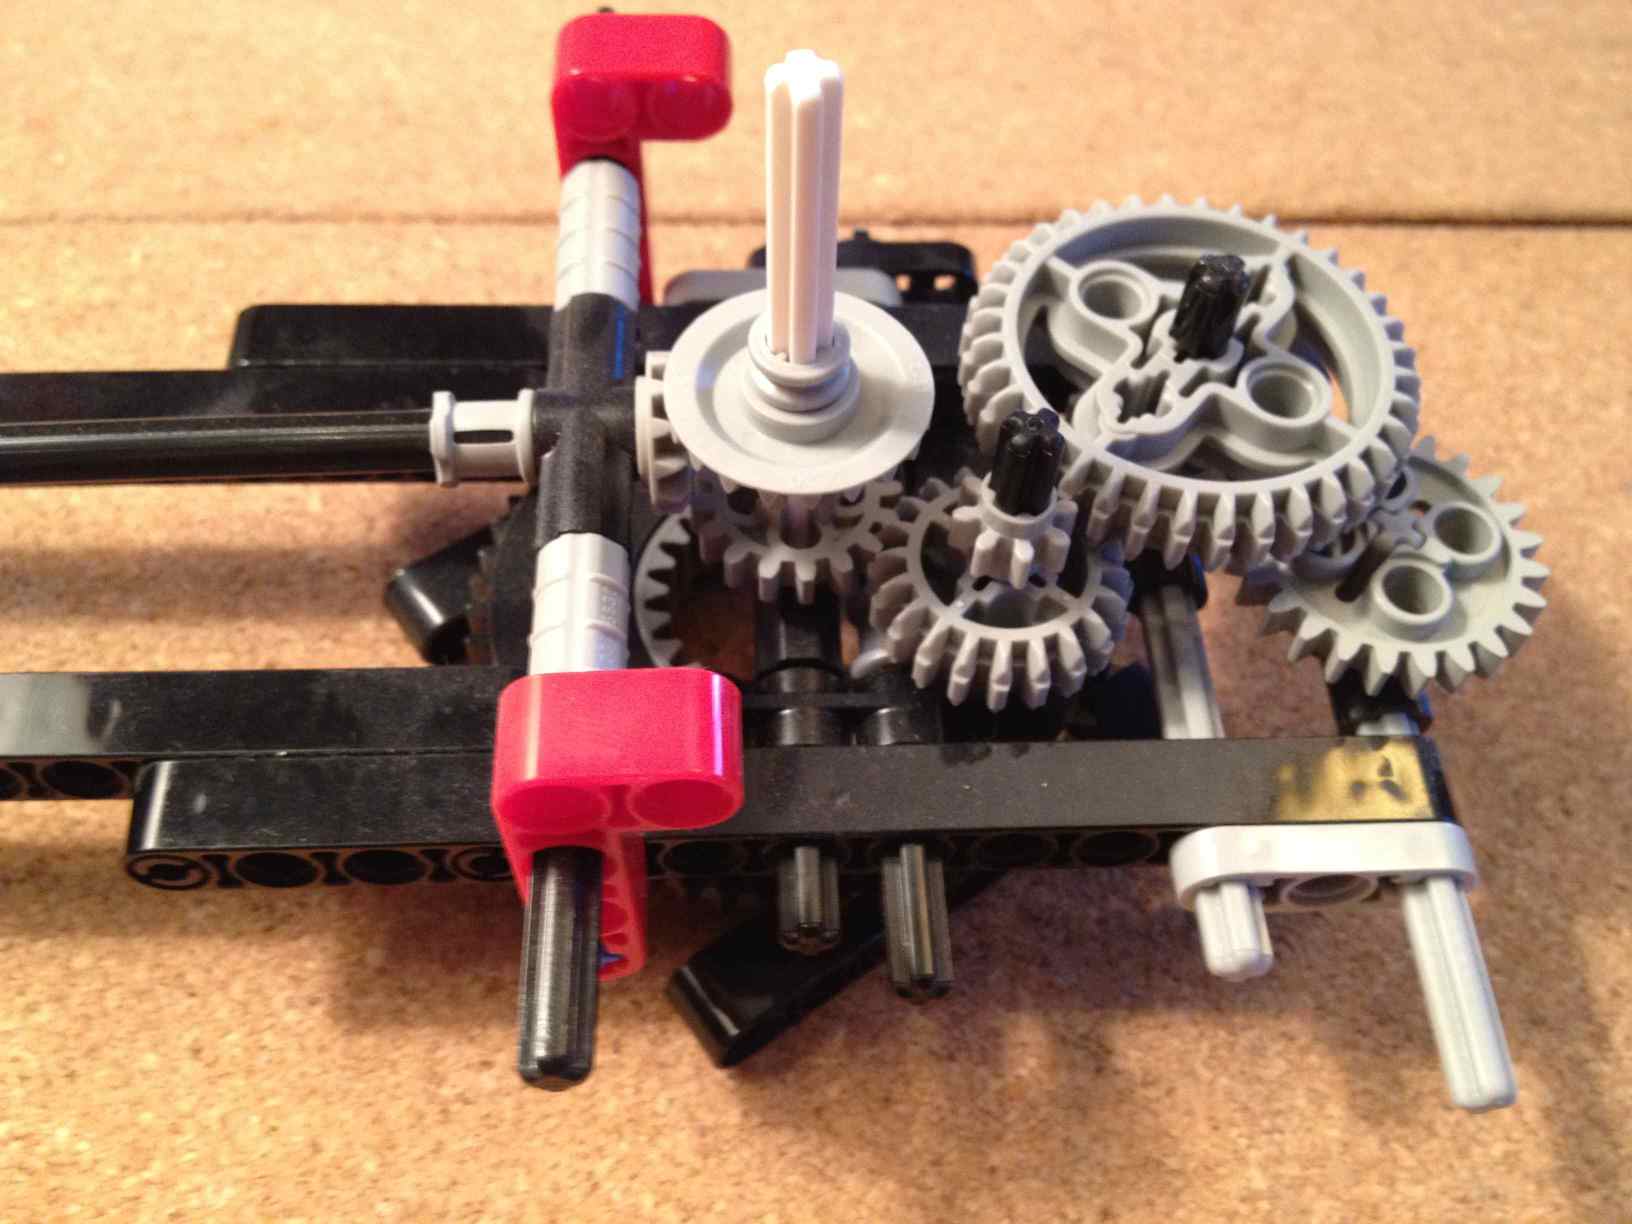
After a bit of a break for the holidays I brought the 8273+8287 project up to version H:
|


The following aspects were improved:
- 2nd planet arm is more elegant.
- Complete moon gearing for the 3rd planet.
- 4th planet has a moon and its arm is more sturdy.
- Minor refinements to 5th planet.
- Central axle is easier to assemble and disassemble.
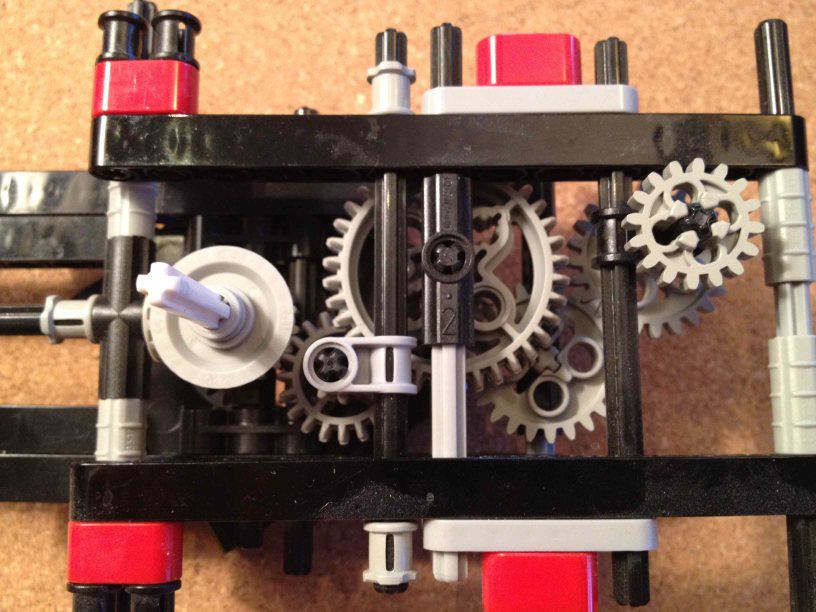
Here is a closeup of the new attachment for the 2nd planet:

H 2nd planet arm
I rebuilt part of the 3rd planet arm to complete the moon gearing:

3rd planet gears
The flimsy arm for the 4th planet was replaced with the recently developed robust differential attachment, and a moon was added.
|


A few minor changes were made to the 5th planet arm, and I did extensive testing to ensure I was ready to freeze the design and begin documenting it.
20080102
I disassembled the model and photographed everything necessary to create building instructions — 347 images averaging 27K each.
20080106
I explored another way of making use of multiple levels of stacked turntables. This method is described in the Whiting paper [2] as "Method 5" (two component rotating epicyclic). The basic idea is to have a central axle that turns rather fast, and each planet on an arm that turns at its own rate much slower than the central axle; and each arm pushes the one above it at whatever speed is needed (relative to its own rotating reference frame).
It is flexible because each level can have whatever gears are needed to generate the exact needed orbital period. I used turntables, with the gray side facing down, and each level turns the outer edge of the level above it, which makes all the gearing above it turn along with it. In addition there can be a radial axle that goes out to the planet to make its moon turn.
|

{In 2012, I made detailed building instructions for this module:
|
Read the full description here: The Original Prototype. -RPM 20121223}
20080108
It would be nice to be able to add Callisto to model 2B. This could be done with another turntable — but if you just stick model 2B on top of a rotating platform, the direction in which the three inner moons align would rotate with it. If the simple gearing in model 2B is to be kept, it has to be supported without rotating — but Callisto has to be below it.
The solution to this is a fixed support that extends through the center of the two turntables, and leaves the lower one free to rotate.
|

{This seemed to have too much friction to be practical, so I did not pursue it any further. -RPM 20121223}
The Hailfire Model: Extreme Co-planar Gears
20080109
What is the most number of planets you can get in an orrery that has all of its gears in the same plane? The reauirements are: one gear per axle, all axles are parallel, and no bevel, worm or crown gears, and each planet has a different orbital period with the faster ones closer to the center.
Using LEGO only, the answer seems to be three, using this surprising arrangement based on the Hailfire Droid wheel (part x784), a part that was only ever used for one set. Here is the beginning of it:
|

This setup has two concentric sets of epicyclic gearing. The turntable in the center would be made to turn by the same method used in model A above. If the carrier for the z36 and z40 gears remains fixed, the large ring gear moves at 1/3 the rate of the turntable. Inside the turntable, the little blue gear remains fixed. To get three planets moving at different rates, the first planet would be attached to the yellow sun gear, the second to the turntable and the third to the large ring gear.
While still working on the building instructions for model H (and ideas on how to make a huge PDF file available to others), I continued investigating alternate ways of gearing. Sometimes I just spend a lot of time trying to find new ways to connect one or more LEGO pieces that aren't really meant to be connected! Today I stubled upon the "inside-out differential" described here: Inside-Out Differential.
")
Inside-Out Differential (on the right)
Using it as the core mechanism, I created the orrery shown here:

2B: Triple Star with Planet and Moon
The gearing in this model is quite diverse:
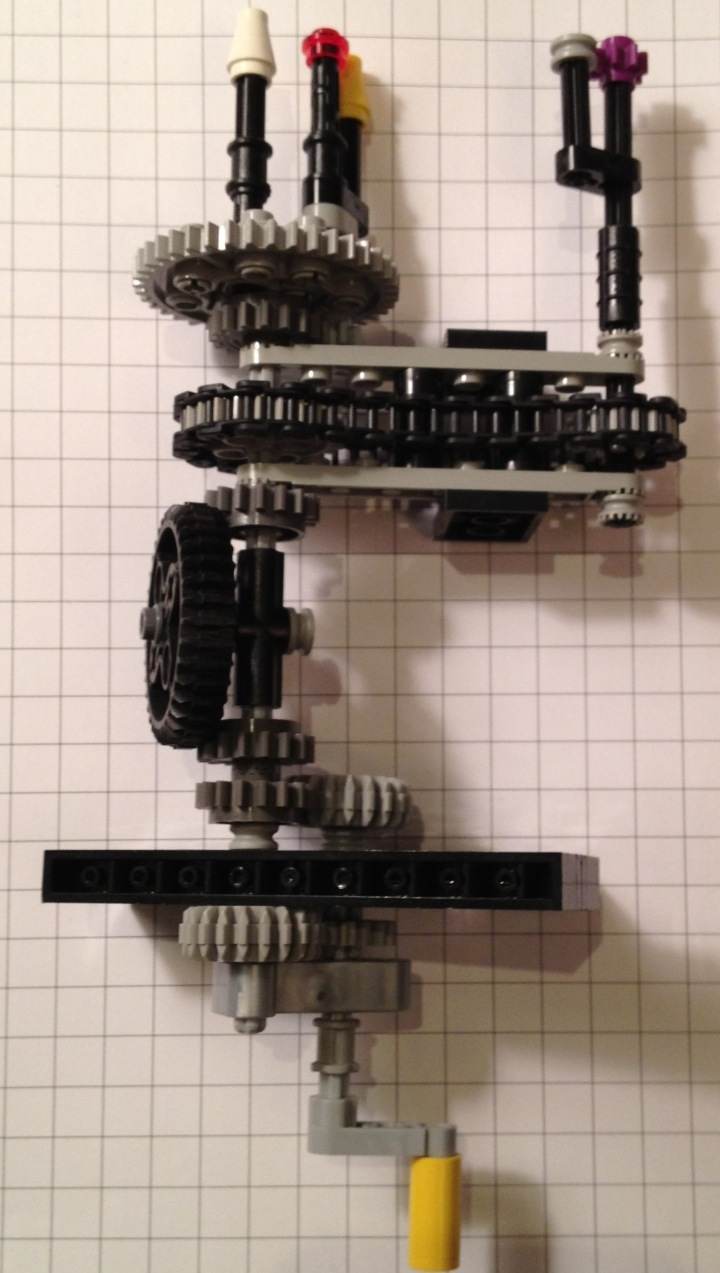
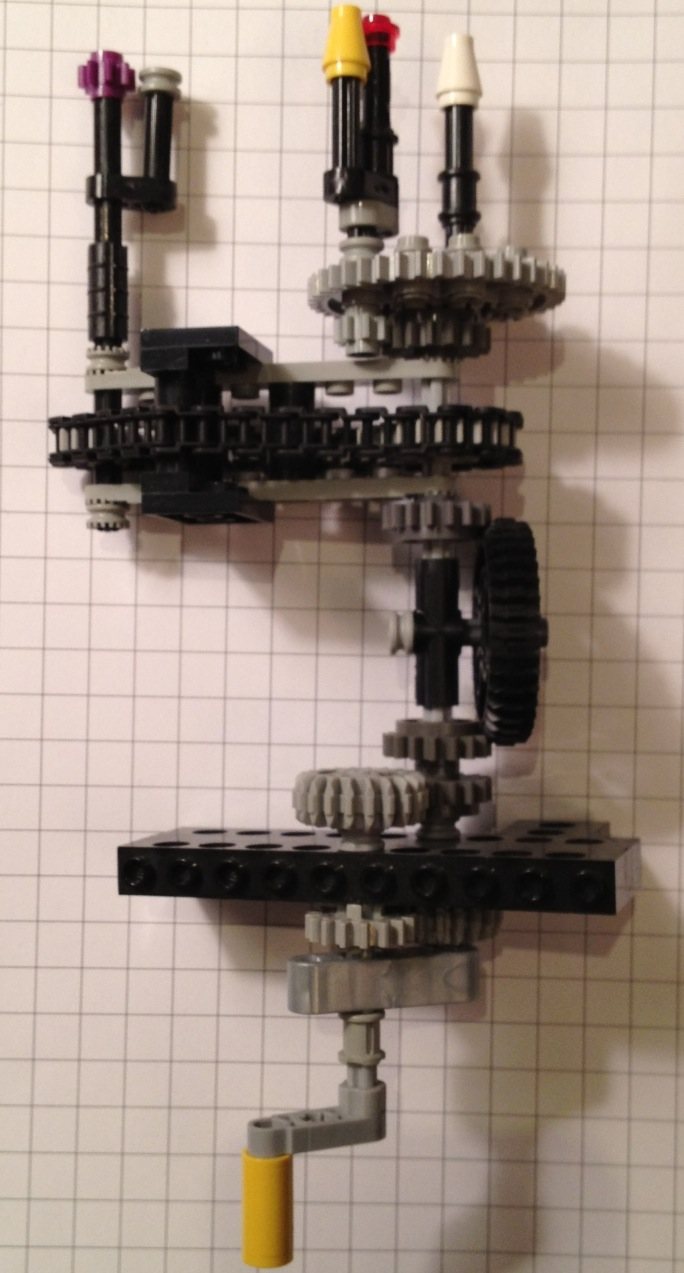
I'll describe it starting at the bottom.
The crank turns a 16-tooth gear, which drives a 20 attached to the central axle of the orrery. Also attached to the central axle is the sideways 36-tooth gear, a 24-tooth gear inside the chain, and a 40-tooth gear near the top.
The crank also turns a 20-tooth gear, that drives a pair of dark-gray gears. All the dark gray gears in the photo are part 6542, the 16-tooth gear with a round center, and they are free to turn independently of the axle.
The sideways gear and the two dark gray gears it touches act as a differential. Their effect is to make the upper dark gray gear turn a lot slower than the lower one, but still in the same direction.
Using the little teeth in its hub, the dark gray gear is attached to a 1x8 beam (part 4442) which also happens to have the little teeth and fits perfectly. The 1x8 beam can turn freely on the axle, so the result is that it "orbits" at the rate the dark gray gear is turning, without regard for the speed of the central axle. Another identical beam is positioned two studs higher, and upside down. This allows another dark gray 16-tooth gear to be attached, and also allows both beams to be stabilized by connecting them with pin joiners (part 75535).
At the outer end of the 1x8 beams, the planet axle is mounted. This axle is secured with old-style half bushings, but as you can see, I have faced the teeth the other way so the axle is free to turn. This entire arrangement of the beams, the pin joiners and second axle allows me to mount gears linked by a chain, and the planet axle turns with it. A z24 drives a z16, so the planet axle will rotate a bit faster than the central axle. This rotation makes the moon go around the planet.
The topmost of the dark gray gears turns with the planet, and the large 40-tooth gear above it turns with the central axle. There is a little axle mounted through one of the round holes in the 40-tooth gear (I've always wanted to use one of those holes for something!). On this small axle is a little 8-tooth gear that meshes with the dark gray gear. As the 40-tooth gear turns, the little 8-tooth gear turns too, and at a fairly high rate. It makes the close pair of stars (represented by the red and yellow bits at the top) revolve around each other. The other "star" (the white bit) is attached to another of the holes in the 40-tooth gear. It is a bit off-center to illustrate the idea that it is counterbalancing the red and yellow stars.
First page . . . Back to page 3 . . . Forward to page 5 . . . Last page (page 7)
LEGO® creations index
The graph paper in my newer photos is ruled at a specing of 1 LSS, which is about 7.99 mm.
This site is not affiliated with the LEGO® group of companies.
LEGO®, Duplo®, QUATRO®, DACTA®, MINDSTORMS®, Constructopedia®, Robotics Invention System® and Lego Technic®, etc. are trademarks or registered trademarks of LEGO Group. LEGO Group does not sponsor, authorize or endorse this site.
All other trademarks, service marks, and copyrights are property of their respective owners.
If you want to visit the official LEGO® site, click here
Parts images are from LUGNET. On this page they explicitly give permission to link to the images:
Note: you may link (as in, Yes, it's OK) directly to these parts
images from an off-site web page.
 s.27
s.27